Open source media center software XBMC shines as a user interface for home theater PCs and set-top boxes, but if you're like me and let your main PC double as an entertainment center, maybe you haven't considered XBMC as desktop software. If you have a multi-terabyte collection, the detailed eye-candy interface can be a big upgrade over sifting through folders or using the basic library functions in a lot of players. As a player, it's just as reliable for varied formats and codecs as VLC or Daum's PotPlayer.
It does take some set-up, though, especially getting your files sorted in a way that XBMC can recognize them to grab metadata (artwork, thumbs, summaries, cast, and even trailers with a YouTube add-on). I used Lifehacker's "Kickass Media Center" guide as a starting point, but the section on importing media is less than detailed, and even the XBMC wiki page on file naming conventions is vague and sparse. In the end, I figured out what XBMC wanted mainly through trial and error, with some unnecessary detours along the way. Hopefully this post can save you stumbling down some of those blind alleys.
Folder Structure
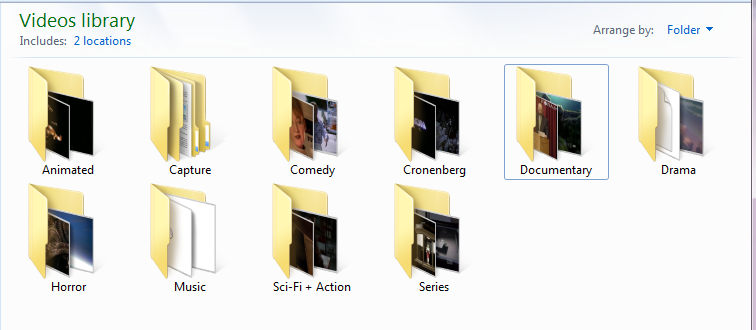
The simplest way to go is make one folder for your movies and another for your TV shows. If you currently have your movies sorted into folders by genre alongside your folder for TV shows, like I did,
you don't have to re-sort them. You can add all of the genre folders as one library source using the instructions from the bottom of this XBMC wiki page, and add the TV show folder as a separate source.
Inside your movie folder(s), it's okay if some of your movies are in a sub-folder with the movie name and others are just sitting out as video files. XBMC isn't going to ask you which way you did it; it will scan for both. In your TV folder, you'll need a sub-folder named for each show, and inside you can have all of the episodes just sitting out or you can have them in another set of sub-folders by season, or a combination of the two.
Renaming Your Files
XBMC is pretty forgiving about file names, but you'll probably have a few that it can't parse.
For movies:
- Either the actual movie file or the sub-folder it's in needs to include the name of the movie, and if possible the year it came out in parentheses or brackets.
- In sub-folder names, use actual spaces between words. In file names, any common "space" character works: period, dash, underscore, or an actual space. No space between words will not work, and you need to use a spacing character on either side of the year in parentheses.
- For a movie with a distinct name (e.g. A Scanner Darkly), XBMC won't need the year.
- Your files can be any mix of the above: some in sub-folders with the movie name, others all together in your main "Movies" folder; some with spaces, some with dots, some with underscores. They don't all have to use the same naming convention.
- Make sure you rename subtitle files to match the movies. You can drop them right in your main movie folder(s) along with the video file.
For TV series:
- Each episode file needs to include the series number and episode number. "Episode 1" in a sub-folder named "Season 2" will not work. It needs to be 201, S02E01, 2x01, [2x01], 2-01, or probably a few other variations. Like the year number in movies, the season and episode numbers must be set off from the rest of the file name by some spacing character ( space _ - . )
- You may need a year, nationality, or network designation in parentheses in the show folder's name if there are multiple series by that name: e.g. (1967), (US), (BBC) and etc.
You may be lucky enough that all of your files already have XBMC compatible names, but if not you'll probably want to use a bulk re-naming utility like den4b's ReNamer, which I found extremely simple and saved me a ton of time in this process. For items you can't fix in bulk, a couple Windows keyboard shortcuts are invaluable: if you're renaming one file in a folder, TAB will apply the changes and move you to the name field of the next file in the folder; CTRL+SHIFT+LEFT or CTRL+SHIFT+RIGHT will highlight the whole word to the left or right of the cursor.
Adding Your Files to XBMC
The XBMC wiki does a good job here: Adding Media Sources.
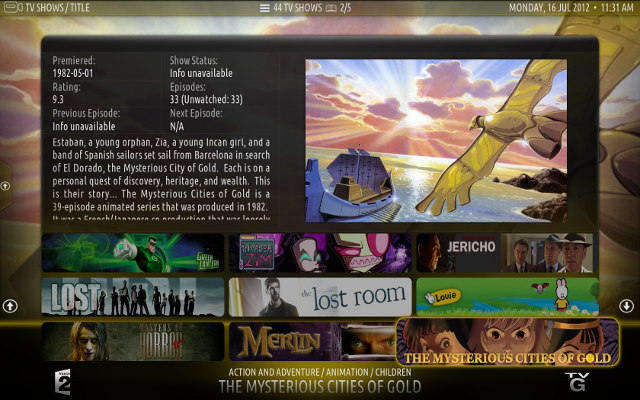
Eye Candy and Navigation
After you get some videos into XBMC, you may find that when you click on "Movies," all you get is a long list. Where's the shiny? You'll see a little arrow tab on the lefthand side of the screen; that's where it's hiding. Remember that XBMC is set up for remote-friendly navigation, so just take your hand off that mouse. Hit the left arrow (or possibly up, depending on how your screen is currently set up) until that tab opens, and you can cycle through the View Mode settings to get more options, and tweak other settings for animation, transparency and other bling.
Nearly everything is accomplished using the arrow keys and ENTER, but there's a nice graphic of the remaining keyboard shortcuts on the XBMC forums. You can also use your Android or iOS device as a remote over WiFi.
If you use a TV tuner card, XBMC won't be your all-in-one solution. Getting even basic support for most tuners involves a lot of trial and error, and time-shifting or reliable DVR probably aren't going to happen. Windows Media Center is still the way to go for live TV, with full-featured DVR, time shifting, and a robust programming guide. XBMC does handle streaming sources like Netflix and Hulu, though.
No comments:
Post a Comment