24 September 2014

Saving Your Android Media Purchases to External SD

My Android modding days are mostly behind me, but I recently found a solution to something that's been bugging me for a while and thought I'd share. More and more devices declare a chunk of internal storage "/sdcard," and many media apps with storefronts have no settings to let you save their content anywhere else. After Google Play Music added a download location setting (only in devices running KitKat, 4.4.1 or later), my worst offenders were Audible and Comixology. I was constantly having to delete old content and limit myself as to how many items I could have on hand to keep space free for apps, despite the nearly empty 64GB SD cards in both my phone and tablet.

This kind of finicky, not-enough-settings issue is exactly what Xposed Framework modules do best. From a user standpoint, Xposed itself doesn't do anything. It provides a framework where developers can plug in specialized apps, called modules. The module that saved the day for me was XInternalSD. 

Your device will need to be rooted with Unknown Sources enabled to install Xposed. If you don't know what those terms mean, you probably don't want to proceed. As usual, I hope you find this information helpful, but I am in no way responsible for anything YOU do to YOUR device. Make a NANDROID backup before you start messing with Xposed.


Before you start


Hopefully you have a file manager (I like ES), and I would recommend a storage visualizer like DiskUsage for tracking down where your data is now and making sure it gets where you want it to go. You may also want to track down the package names of all the apps you want to redirect to the external SD, though you can also let XInternalSD try to point anything and everything to external. The easiest way to get package names is to look up the app on Google Play in a web browser. The part of the URL following "id= " is the package name, for instance com.audible.application for Audible. 

Setting up XInternalSD


  1. Make a backup!
  2. Download and install the Xposed Framework app.
  3. Open the app, tap "Framework," and "Install".
  4. Go back and tap "Download".
  5. In the search (Magnifying glass up top) type "xint".
  6. Tap XInternalSD, swipe left to the Versions tab, and download latest release.
  7. Install, then hit Done.
  8. Go back to main menu (or until you have a drop-down menu up top) and choose "Modules".
  9. Check the box for XInternalSD, then tap XInternalSD to get to its settings.
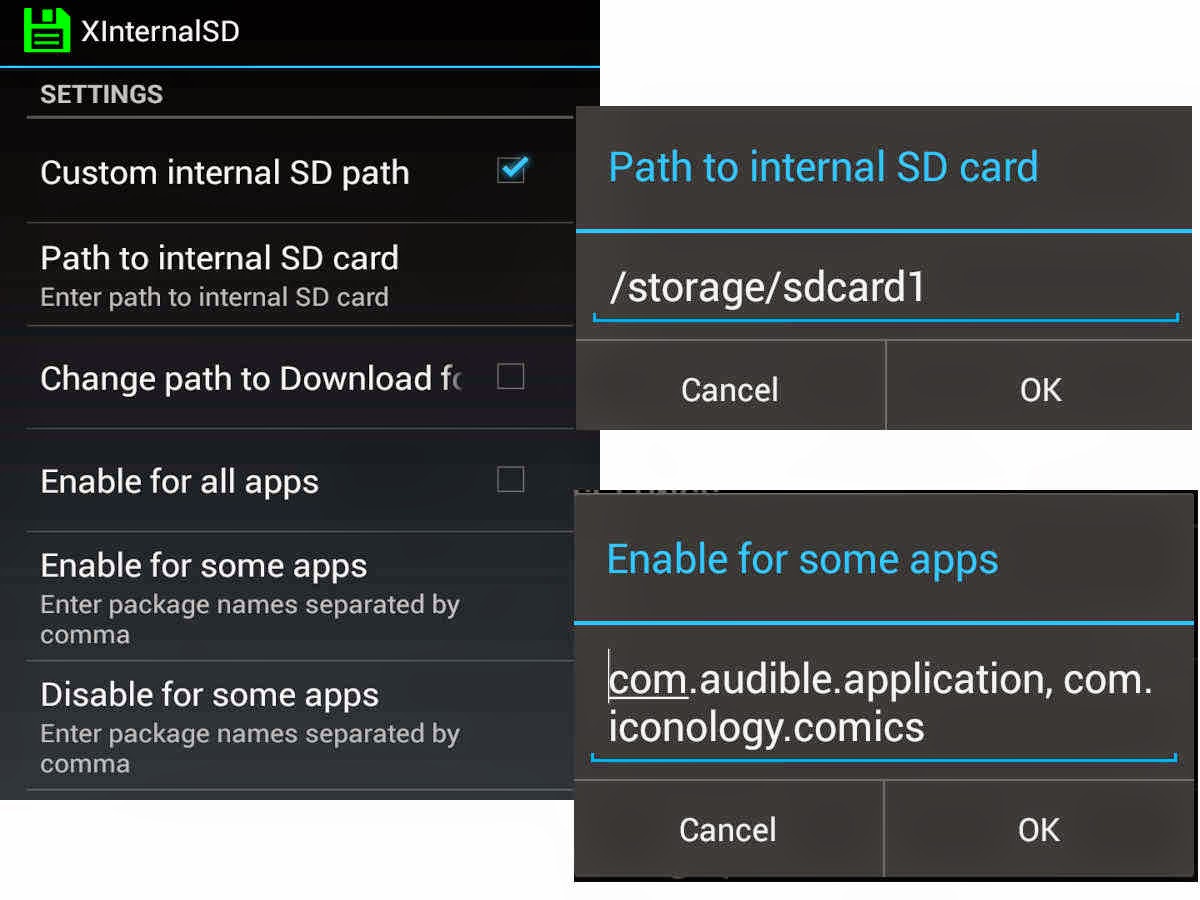
  10. For "Path to internal SD card" you probably* want "/storage/sdcard1".
  11. Whether you want "Enable for all apps" checked is up to you. If yes, you don't need to list any package names. If you just have two or three apps in mind, I would say uncheck the box and list them individually.
  12. Reboot your device.

*Devices may vary, and apps will be picky about the path you use. Neither "/sdcard1" nor "/ext_card" worked for me, even though both are valid paths to the same place. I would just confirm in a file manager that there is a path "/storage/sdcard1" to the external card and, if so, use it. 


Setting up your media apps


Manually move your old data folders from the internal to external SD card. It'll be faster than re-downloading any content you already have on hand, and some apps will need to see a folder at the new location or they'll just keep saving internally. Most data folders will either be under "/sdcard/" or "/sdcard/Android/data/" or sometimes "/sdcard/". Make sure you duplicate the "/Android/data/" folder structure at /sdcard1. 

You may need to uninstall/reinstall some apps, too, or at least clear their cache. I reinstalled Audible on both my phone and tablet in the course of troubleshooting, but it may not have been strictly necessary. Comixology did not need any troubleshooting.

If this is your first Xposure (sorry), you'll probably find modules to take care of other annoyances, too. I ended up with almost a dozen on my un-ROM-able Jellybean phone, and four or five on my CM11 tablet. 

25 June 2014

Salvaging Asus Netbook Recovery Partitions: Going back to Windows after Linux

Getting Ubuntu, Mint or other consumer-oriented Linux distros set up on a netbook is fairly straighforward--there's not a lot of wrestling with drivers or even much need for the command line, like in the old days. Getting back to Windows a couple of years later can be a little trickier, though, as I discovered tonight.

Many netbooks shipped with neither install discs nor disc drives, leaving only a recovery partition on the hard drive. Back when I set up a somewhat locked-down Edubuntu install for my nephew, I at least had the foresight to leave the recovery partition in place, figuring if the machine survived then I might want to migrate him to Windows down the line. I have the machine (Asus 1005HAB) back for a hardware fix now, and he's a bit older, so the time has come.

Ideally, you hit F9 during boot and recovery just happens. My best guess for why that didn't happen in my case is that Linux overwrote the necessary files in the Master Boot Record (MBR). I found reports from others who had the same experience after running Linux live USBs, without ever actually installing Linux. In those cases, repairing the boot files with the ms-sys utility from a Linux live USB did the trick. With no Windows installation present, ms-sys didn't work for me. 

What I ended up doing was copying the recovery partition (about 5GB) to a USB stick, deleting the original (which I'd also backed up along with the old Linux partitions on an external hard drive) and setting the boot options in BIOS to boot from the USB stick. Most of the partition work was done using a gParted Live USB. I'd merged and reformatted the netbook's Linux partitions to NTFS along the way, or I probably could have used gParted in the original install. I was back and forth between the netbook and my main PC, juggling three bootable USBs and an external hard drive by the end, but if I'd known what would be necessary, it could probably all have been done with the netbook and one USB stick.

Chances are anyone finding this post is already as far up a creek as I was by that point, but maybe I can save you some frustration. As usual, I make no claims and accept no liability regarding what YOU do to YOUR DEVICE. Proceed at your own risk. Breaking it down:

Tools

  • At least one USB stick (two preferred). One must be larger than 4GB.
  • At least one computer with a functioning OS. 
  • Recommended, maybe required: a gParted Live USB (LiLi USB for Windows can help you here)*

Steps

  1. Back up! If you have any external storage available, back up the netbook's current system, ideally at the partition level using gParted.
  2. Using gParted, delete the current partition(s), if any, on the USB stick.
  3. Copy the recovery partition, probably the first partition, a few GBs in size, on the netbook hard drive*
  4. Paste the partition to the unallocated space on the USB stick. You can also expand the new partition to fill the stick if you like.
  5. Make sure the new partition is still marked as a "boot" partition (it would be "active" in Windows). 
  6. Make sure you hit Apply!
  7. Delete the original recovery partition, and hit Apply.*
  8. When changes are complete, shut down.
  9. Remove the gParted live USB if applicable, leaving the new recovery USB, and power on.
  10. During boot, hit F2 to enter BIOS.
  11. Navigate with the arrow keys to Boot, go down to Hard Disks, and using Enter choose your USB stick as number one.
  12. Hit F10 to save and exit.

From here, recovery should proceed automatically with a couple of restarts. It will take a few minutes and return the machine to Asus factory setup for either XP or Windows 7 Starter, with all the Asus bloatware you would expect.

*If you attempt to use gParted from within your current Linux install on the netbook, it may not let you delete the original recovery partition, which is NECESSARY. Otherwise, you'll get into recovery on the USB stick, but get an error that the target partition is too small, because recovery on the USB is trying to write to the first partition it sees, which is the little recovery partition on the hard drive. It may also be necessary to merge and/or reformat the old Linux partitions--I'd already done it in the course of trial and error--for recovery to recognize them. If so, you'll want to format as NTFS. 

Also, most Linux images for a Live USB will include gParted--you don't have to go with the image named "gParted" if you want to have a more full-featured distro or utility disk handy. There are also partition managers like EASEUS for Windows that could handle most of this stuff, but they probably won't be able to get at the hard drive in your netbook. I used EASEUS on my PC to set up my recovery USB stick just because I was trying other things on the netbook and wanted to multitask. 

Much of this process would probably generalize to any laptop (or even off-the-rack desktop) refusing to do a factory reset, though I can't guarantee anything. And of course, conscientious backups and recovery discs could spare us the necessity, but throwaway machines like these tend to get separated from their backups, and recovery media, and OSes...